ReactNativeのExpoでdrawerの実装解説【2023年エラー解決法あり】

「画面遷移のdrawerを実装できるようになりたい。」
「公式サイトだけでなく、誰かが実装しているところを参考にしたい」
公式サイトだけだと実装がうまくいかなかったときにうまく対応できないなどの時があるかと思います。
今回は、ReactNativeのExpoで画面遷移の中の1種drawerを実装していこうと思います。
drawerとは、画面の端を引っ張って出てくる画面遷移のことで、メニューなどに使われます。
あなたの作ってるアプリにもdrawerを実装して、よりUIに優れたアプリにしていきましょう。
目次(クリックで読みたい部分にジャンプできます)
今回は、React Navigationを使っていきます。React Navigationの中には、3つの画面遷移があります。
- stack - ボタンを押して画面を遷移する
- tabs - 画面下部のボタンを押して遷移する。
- drawer - 画面端から引っ張って画面を出す。
今回は、drawerを実装していきます。stack tabs, やそれぞれの詳しい遷移方法などは以下の記事で紹介していますので併せてご覧ください。
ReactNativeのExpoでNavigation(画面遷移)を実装する【2023年】 - プロラブ (abyblog.online)
では、実際に実装していきましょう。
セットアップ
Expoを適当なディレクトリに作っているところから始めます。今回は、Expoで作った最初のファイルを使って作成していきます。(2023年6月、Expoで作ったファイルをそのまま使ってdrawerを実装すると、エラーが出るようになります。エラーの対処法は後述します。)
まずは、以下コマンドをうち、インストール作業をしましょう。①②はReact Navigationを使用するためには、共通でインストールしているものです。③はdrawerに必要なインストールです。
①
npm install @react-navigation/native②
npx expo install react-native-screens react-native-safe-area-context③
npx expo install @react-navigation/drawer画面遷移を実装していく
では、drawerの画面遷移を実装していきます。
import * as React from 'react';
import { Button, View } from 'react-native';
import { createDrawerNavigator } from '@react-navigation/drawer';
import { NavigationContainer } from '@react-navigation/native';

function HomeScreen({ navigation }) {
  return (
    <View style={{ flex: 1, alignItems: 'center', justifyContent: 'center' }}>
      <Button
        onPress={() => navigation.navigate('Notifications')}
        title="Go to notifications"
      />
    </View>
  );
}

function NotificationsScreen({ navigation }) {
  return (
    <View style={{ flex: 1, alignItems: 'center', justifyContent: 'center' }}>
      <Button onPress={() => navigation.goBack()} title="Go back home" />
    </View>
  );
}

const Drawer = createDrawerNavigator();

export default function App() {
  return (
    <NavigationContainer>
      <Drawer.Navigator initialRouteName="Home">
        <Drawer.Screen name="Home" component={HomeScreen} />
        <Drawer.Screen name="Notifications" component={NotificationsScreen} />
      </Drawer.Navigator>
    </NavigationContainer>
  );
}
あえて、公式サイトと同じものを引用しています。
公式サイトでは、これで実装すれば良いと書いてありますが、エラーがでて実行できないです。
それらのエラーへの対処法を以下に記載します。
エラーの対処法
エラー①:Reanimatedのバージョンの違い
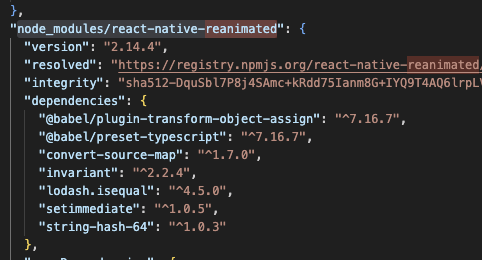
ERROR [Reanimated] Mismatch between JavaScript part and native part of Reanimated (3.1.0 vs. 2.14.4). Did you forget to re-build the app after upgrading react-native-reanimated? If you use Expo Go, you must downgrade to 2.14.4 which is bundled into Expo SDK.
ERROR Error: Failed to create a worklet. Did you forget to add Reanimated Babel plugin in babel.config.js? See installation docs at https://docs.swmansion.com/react-native-reanimated/docs/fundamentals/installation#babel-plugin., js engine: hermes

こんな感じのエラーが出ていますでしょうか?このエラーは、React Nativeの中にある、Reanimatedというライブラリのバージョンが合わないですよ。というものです。
以下のように対処します。
- コマンドラインで以下を記入
- npm install react-native-reanimated@2.14.4
- --clean をつけてExpo再起動
- expo start --clean
これで、package-lock.jsonの中の、「node_modules/react-native-reanimated」のバージョンの記載が、2.14.4となっていることを確認してください。
エラー②:react-native-reanimated の起動に失敗しました
Error: Failed to initialize react-native-reanimated library, make sure you followed installation steps here: https://docs.swmansion.com/react-native-reanimated/docs/fundamentals/installation/
1) Make sure reanimated's babel plugin is installed in your babel.config.js (you should have 'react-native-reanimated/plugin' listed there - also see the above link for details)
2) Make sure you reset build cache after updating the config, run: yarn start --reset-cache, js engine: hermes
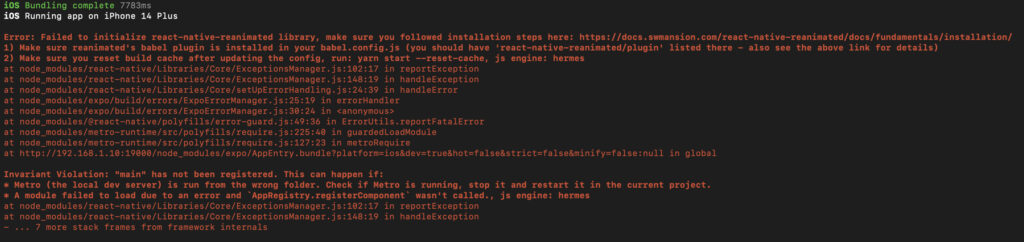
reanimatedのバージョンを変えたことにより、このエラーが出る場合があります。
以下のように対処します。
- babel.config.jsを編集。
pluginsの中に、'react-native-reanimated/plugin'を追加 - 〜〜〜〜
presets: [
〜〜略〜〜
],
plugins: [
〜〜略〜〜
'react-native-reanimated/plugin'
〜〜略〜〜
]
- --clean をつけてExpo再起動
- expo start --clean
まとめ
今回は、React NativeのExpoでReact Navigationを用いたdrawerの画面遷移を実装しました。
画面遷移には、他にも、stack tabsなどの遷移方法もあるので、実装してみたい方は以下の記事を参考にしてみてください。